Assets Data Manager Best Practices: From Raw Data to Asset Import


With Assets Data Manager (ADM), you import data quickly, cleanly and without chaos — and lay the basis for reliable data management in Atlassian Assets.

How to Transform Raw Data into Clean, Ready-to-Use Asset Data Step by Step
When working with Atlassian Assets managing and maintaining clean, structured data is crucial. Assets Data Manager (ADM) is a powerful app that simplifies this process helping you import, transform and maintain your asset data with less manual effort. Below is a step-by-step overview of how to go from a raw data source to a clean, ready to use import into Assets.
Prepare Your Source Data
Start by identifying where your data is currently stored. Common sources include:
- CSV or Excel exports from existing CMDBs or inventory tools
- External databases or APIs
- Directory services like Azure AD or LDAP
Before connecting to services like Azure, ensure:
- Each record has a unique identifier (like Asset Tag or ID).
- Field names are consistent and descriptive.
- Data is complete enough to build relationships later (e.g., locations, owners, models, applications).
Tip: If your data has inconsistent formatting (like different date formats), fix what you can at the source, it will save time later.
Move Raw Data into Data Manager
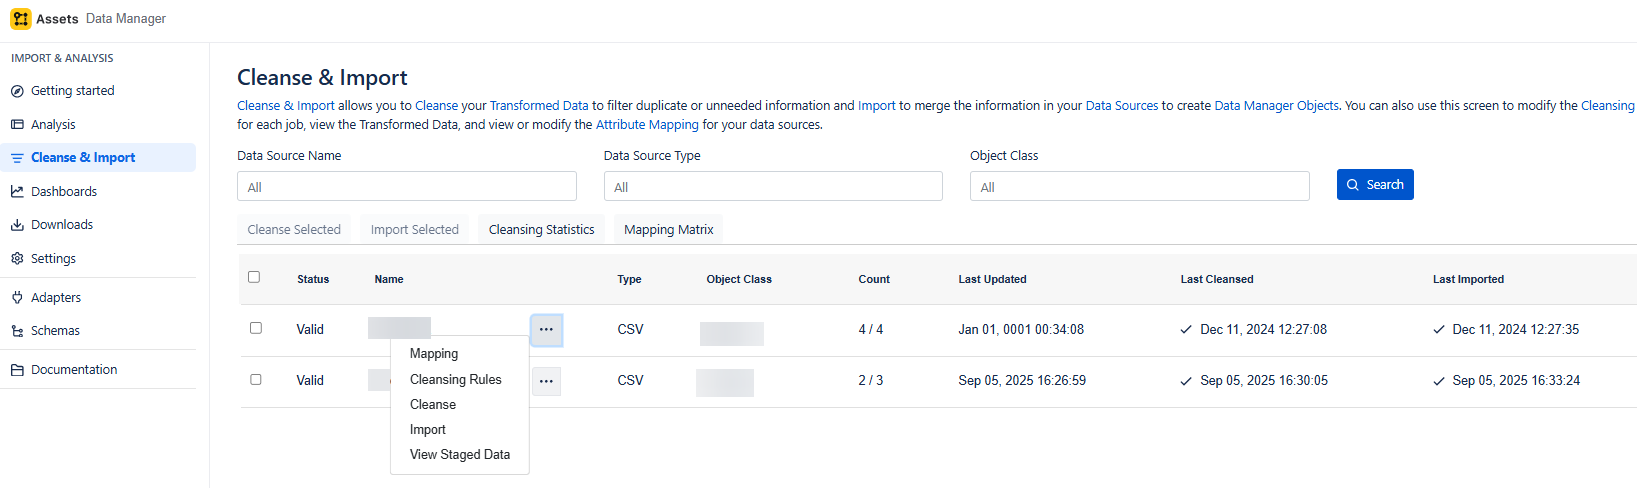
Once your data is prepared, you can import this into Assets Data Manager, please note there are several sources available for importing raw data and the one selected in this example is the Flat File. You can find detailed guides on creating and running a job for all other sources HERE.
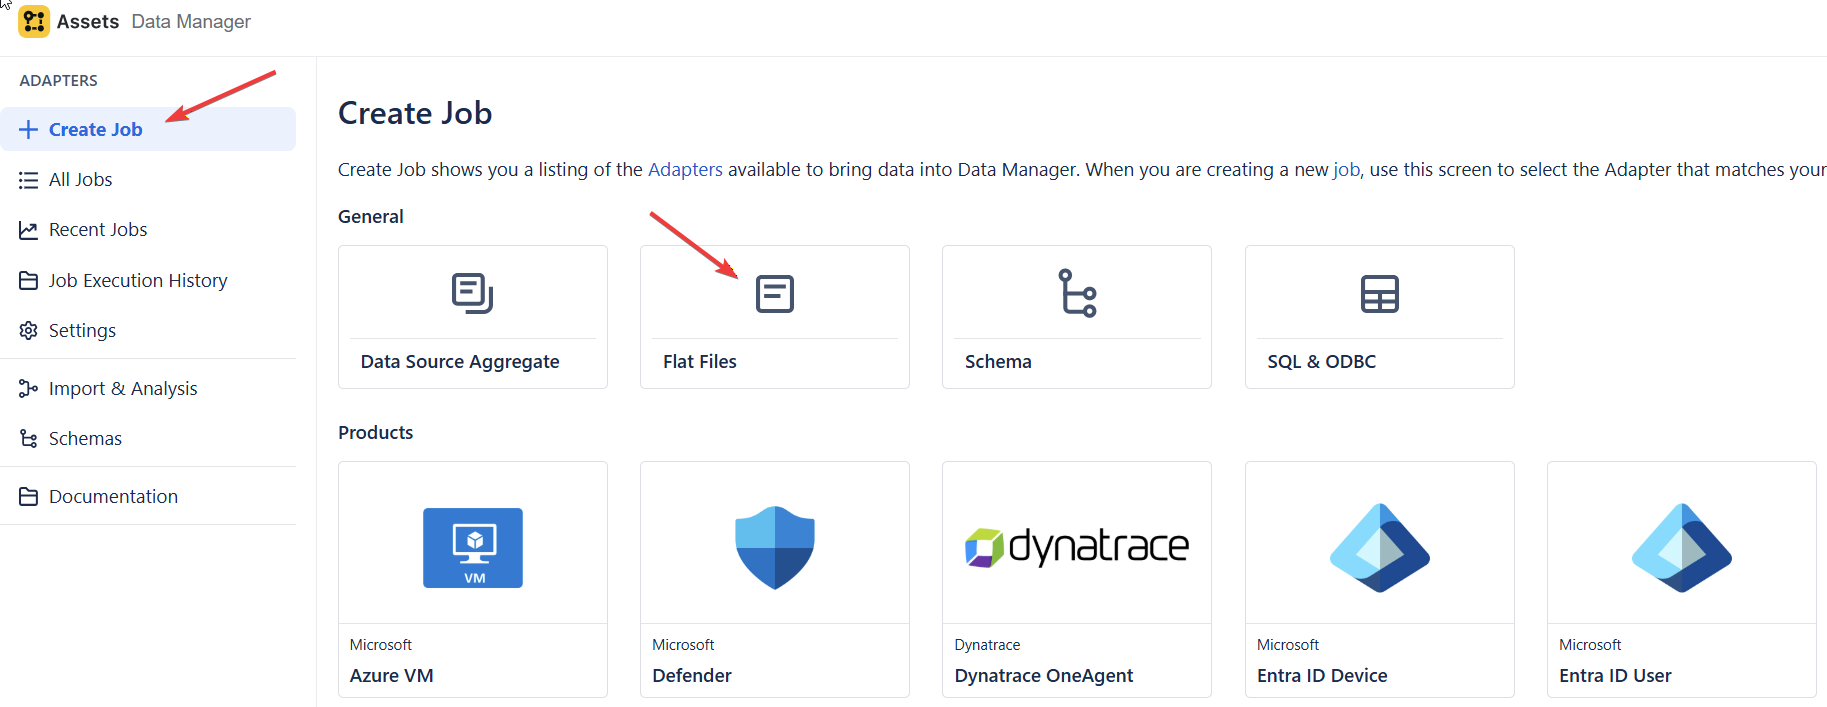
- Go to Data Manager → Adapters → Create Job.
- Choose your import type between General and Products, for this example we used the Flat File method.
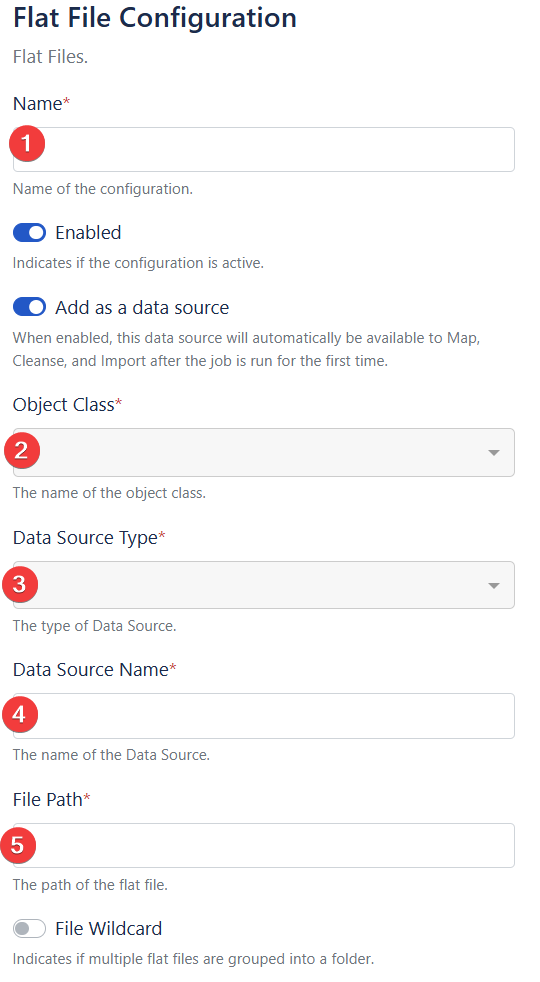
1. Name
Input field for the name of he configuration
-> Name you will see in the job list and it is th nam you ill use to tiger the job
2. Object Class
Dropdown to select the object class associated with the flat file.
-> This defines the data structure or schema the file maps to.
3. Data Source TypeDropdown to specify the type of data source (e.g. CSV, AD, Schema, etc.).
-> Required for identifying how to connect to the data.
4. Data Source Name
Input field for the name of the specific data source.
- Can be whatever makes it easier for you to identify the source later i.e CSVUserImport

5. File Path
Field for specifying the full path to the flat file.
->Must include the file name i.e. C:\Users\Public\Downloads\Example\ExampleUserImport.csv
6. Skip Line
Input for specifying the number of lines to skip at the beginning of the file.
-> Commonly used to skip headers but can be set to 0 to read headers too.
7. Delimiter
Field for entering the delimiter character used in the file (e.g. comma, semicolon etc.).
-> Separates values in each line.
8. Qualifier
Input for the text qualifier character (e.g. double quotes ").
-> Wraps values to prevent splitting at delimiters within text fields.
-> Optional, but recommended for files with embedded delimiters in values.
9. Auto Generate (Column Mappings)
Button to automatically generate column mappings based on a pasted CSV header.
-> Helps in quick setup of field mappings.
-> Paste the headers from the CSV, comma separated i.e. E-Mail,DisplayName,LastName,FistName,City,Country,Status
10. Add Mapping
Button to manually add colmn mappings.
-> Useful when auto-generation is not feasible or needs to be customized.
Once you have generated the mappings you can further define them by stating the type of data stored in column
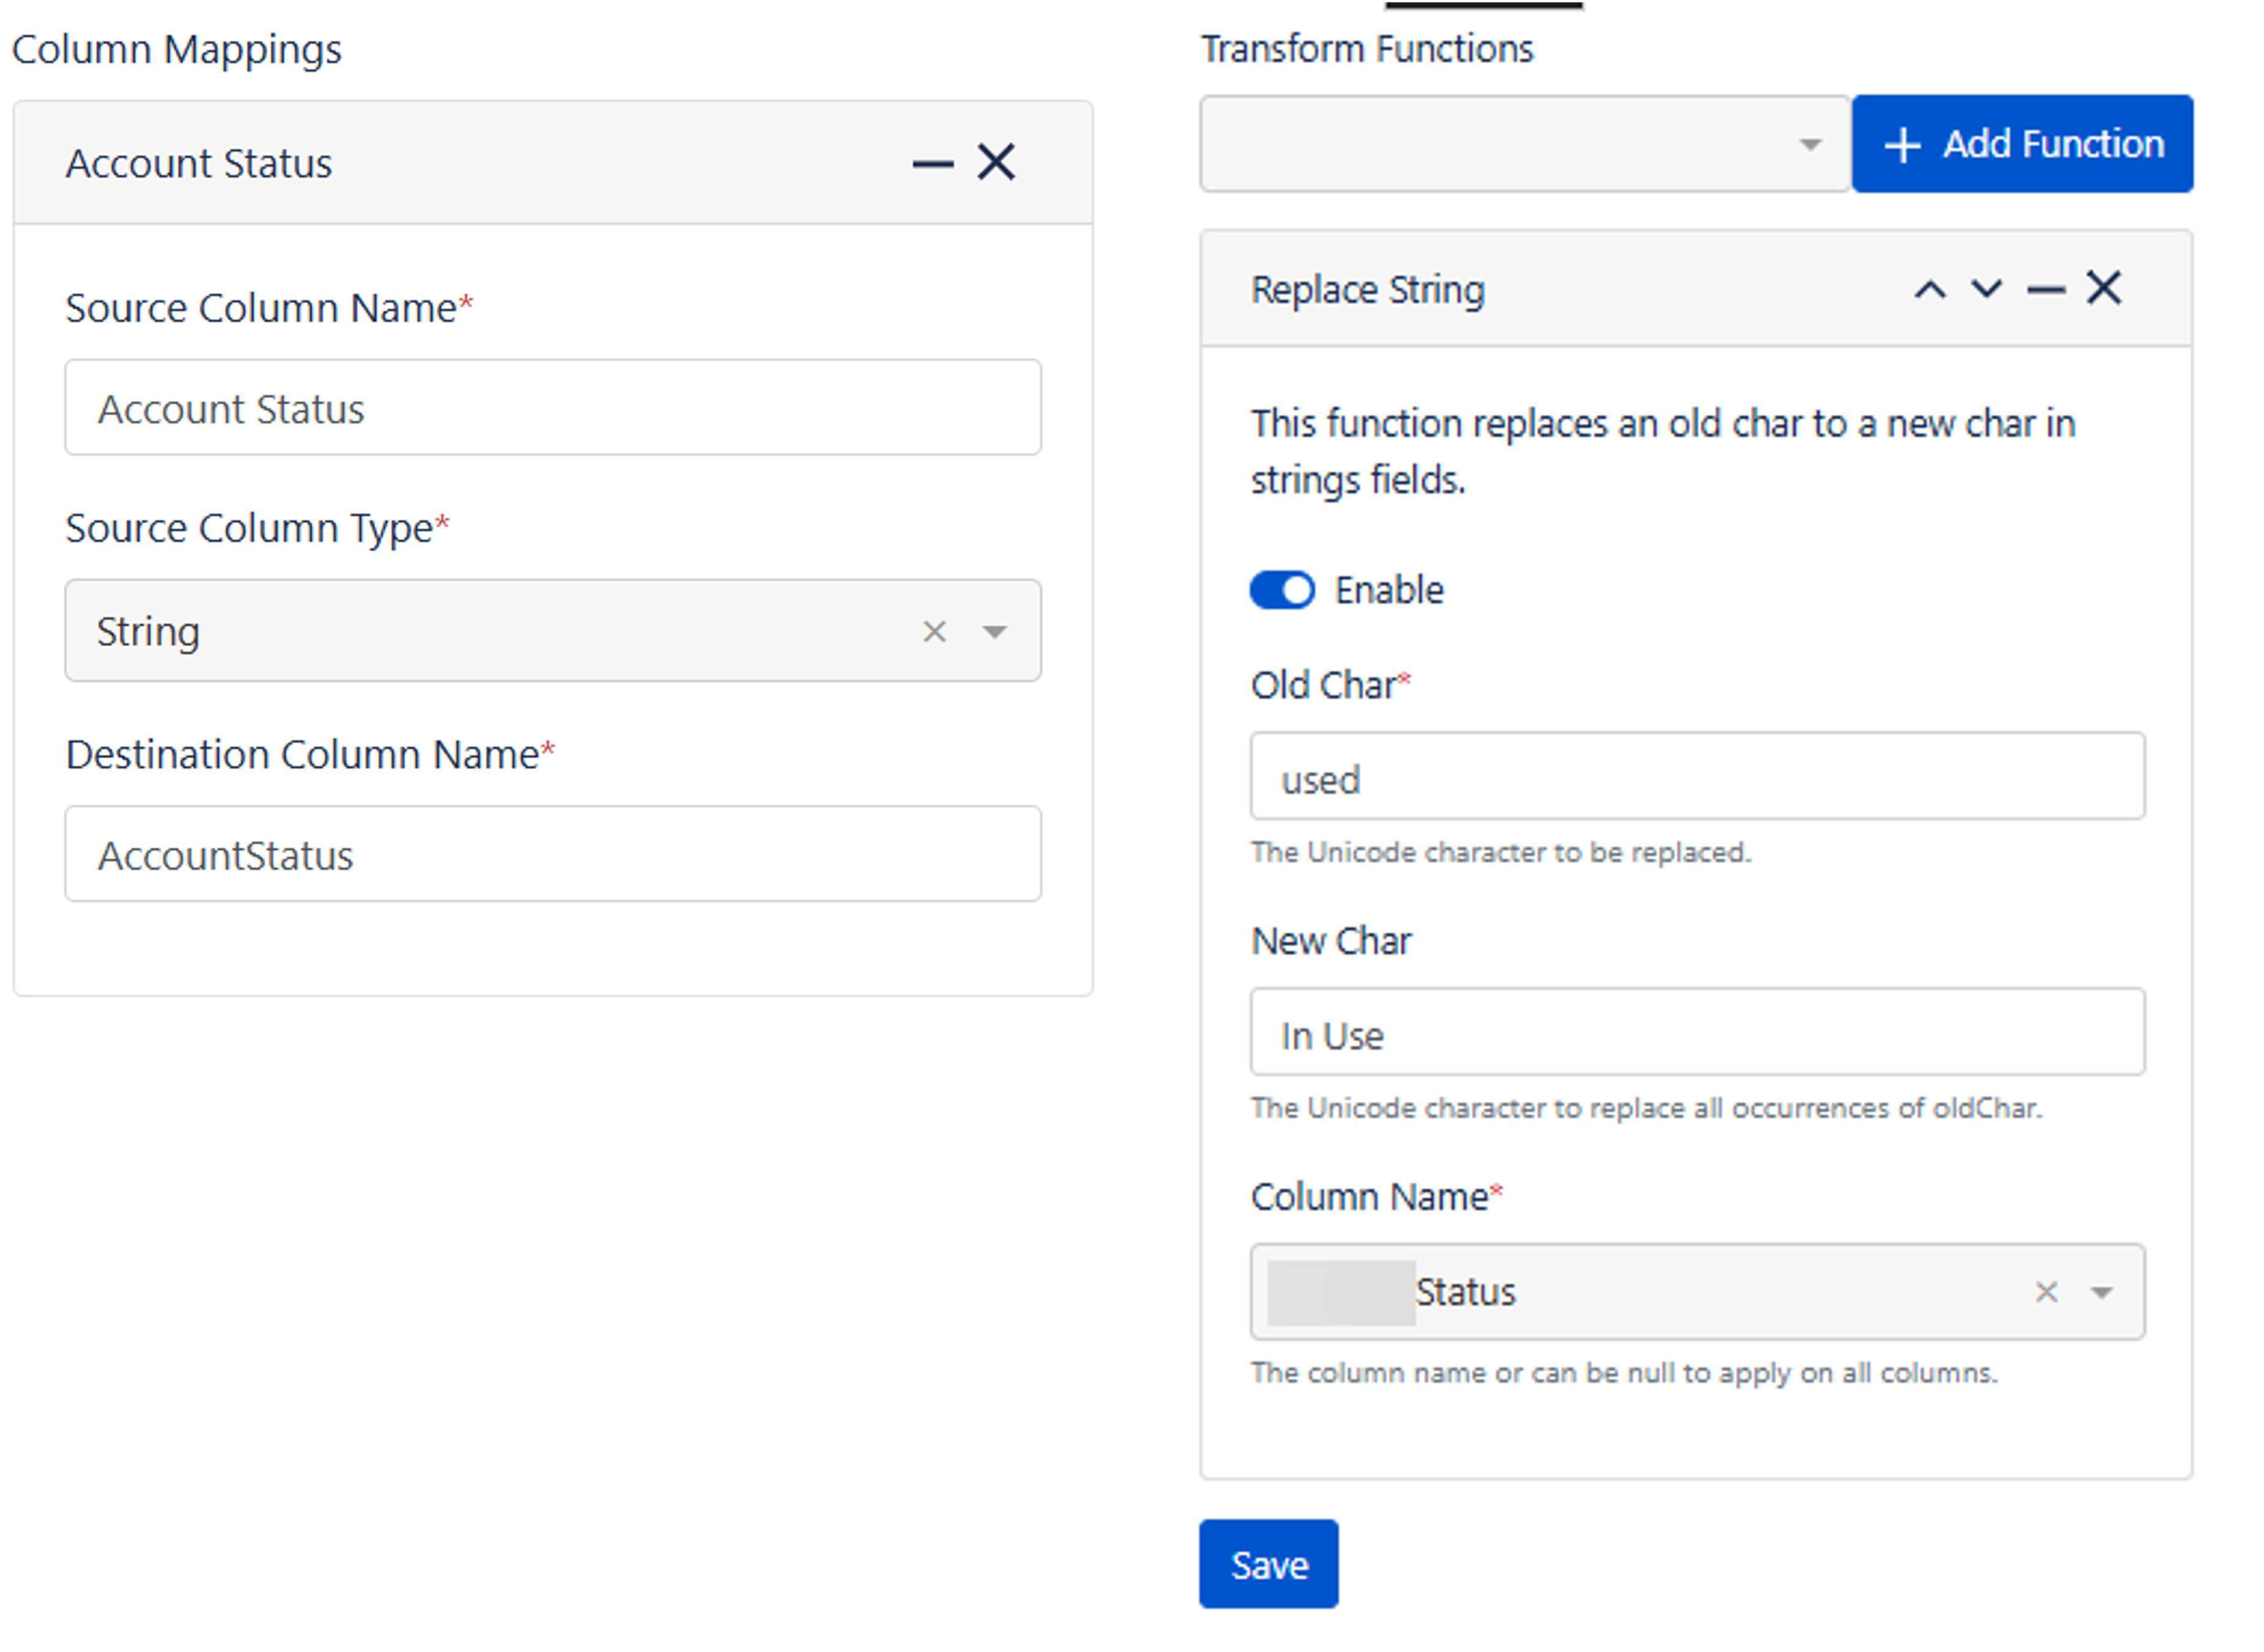
After your first import the Transformations become available and these allow you to refine or enrich data before import i.e:
- Concatenating fields (e.g., “Model” + “Version” → “Full Model Name”)
- Converting text values (e.g., changing status “used” to “In Use”)
This initial import creates a dataset in ADM. Think of this as a staging area where you can safely manipulate data before pushing it to Assets.
Accessing the file
As the job created in this example is from a flat file, we need to download the Adapters Client from the Atlassian Marketplace then navigate to the subfolders for the processor type that matches the computer.
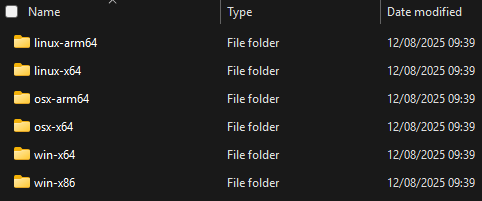
Since the PC used runs on Microsoft 64-bit, this will be the folder used. Inside, both adapters will be available: Cleanse and Import Client and Adapters Client, for a detailed step by step guide see HERE.

To run a job, the adapter token and workspace ID will be needed.
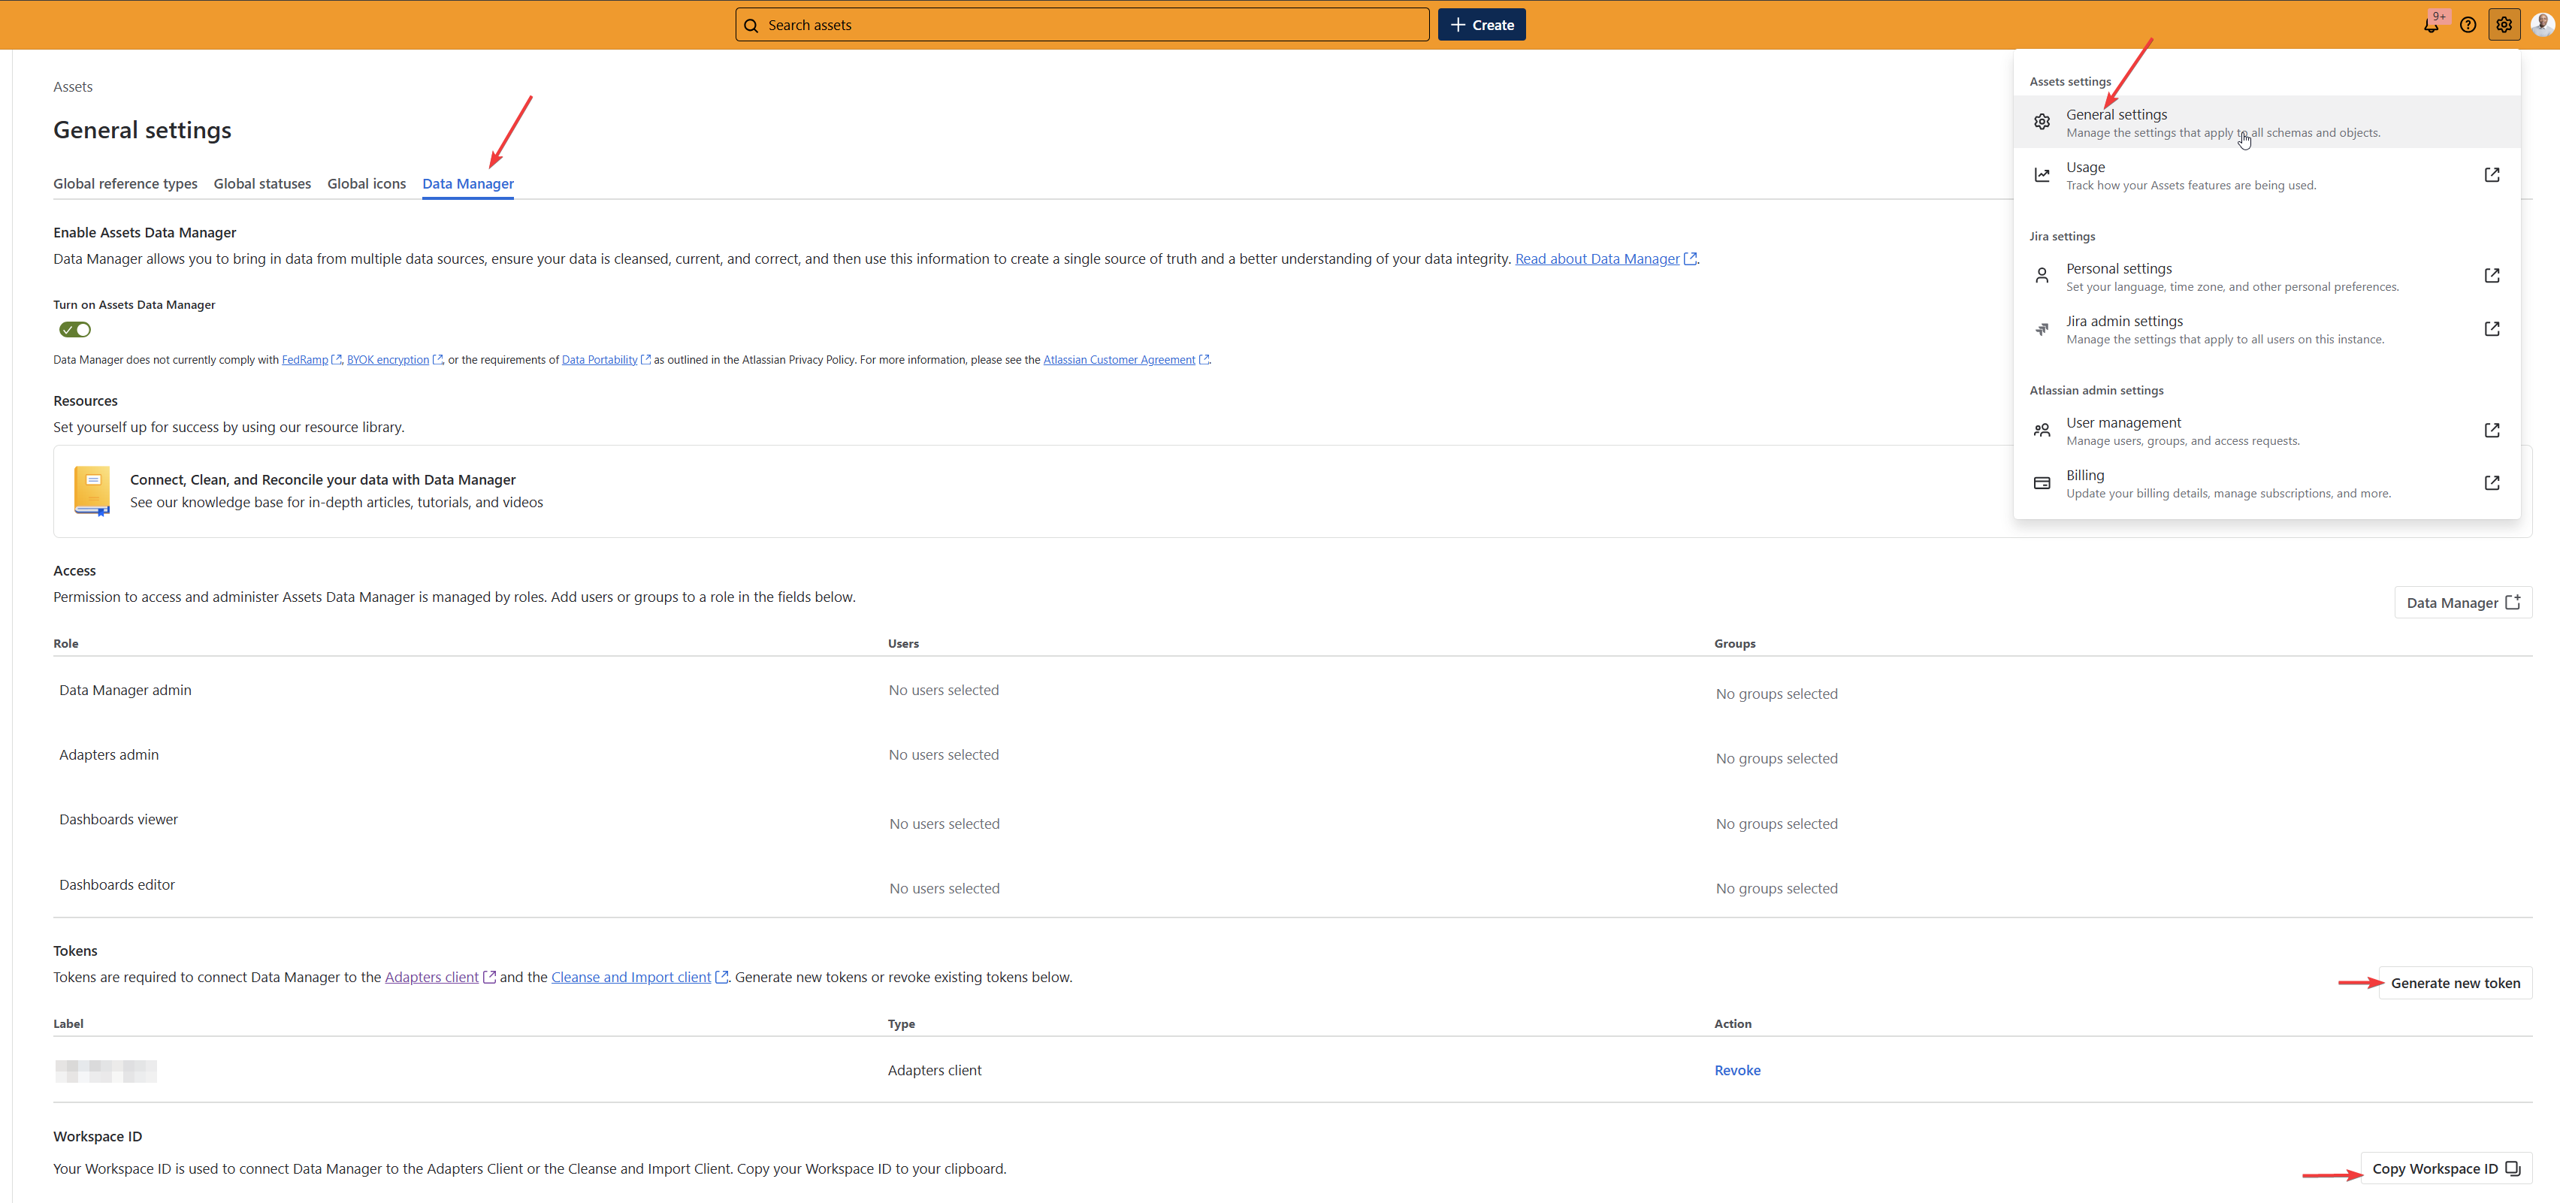
How to find the Token and Workspace ID:
- From the Assets main page, click on the "Settings" dropdown menu at the top right of the page, then General Settings > Data Manager.
- Scroll down and you will see the options to "Generate new token" and "Copy Workspace ID."
Running The Job
Running a job takes place on your local instance, behind the firewall, and using a middleware client app called the Adapters Client. You can run a job manually using the command-line interface, or you can ‘wrap’ the client app in a scheduling app such as Windows Task Scheduler.
To run a job we will use “Command Prompt”, following the detailed Atlassian guide HERE.
Navigate to the folder where you stored the Adapters Client
Tip: Use “.\dm-adapters --help” to test

To run the job you will need this template: .\dm-adapters --run “<myJobName>” --workspace-id “<workspaceId>” --token “<your-Adapters-token>”
- “<myJobName>”: Replace with the name of the job you created earlier
- “<workspaceId>”: Add the workspace id you copied from the settings section
- “<your-Adapters-token>”: Add the token you created in the settings section
- Press enter, then the job will run and a message will show that is was successfully executed.
- For details on how to schedule a job see HERE.
Cleanse and Import Data into Data Manager Objects
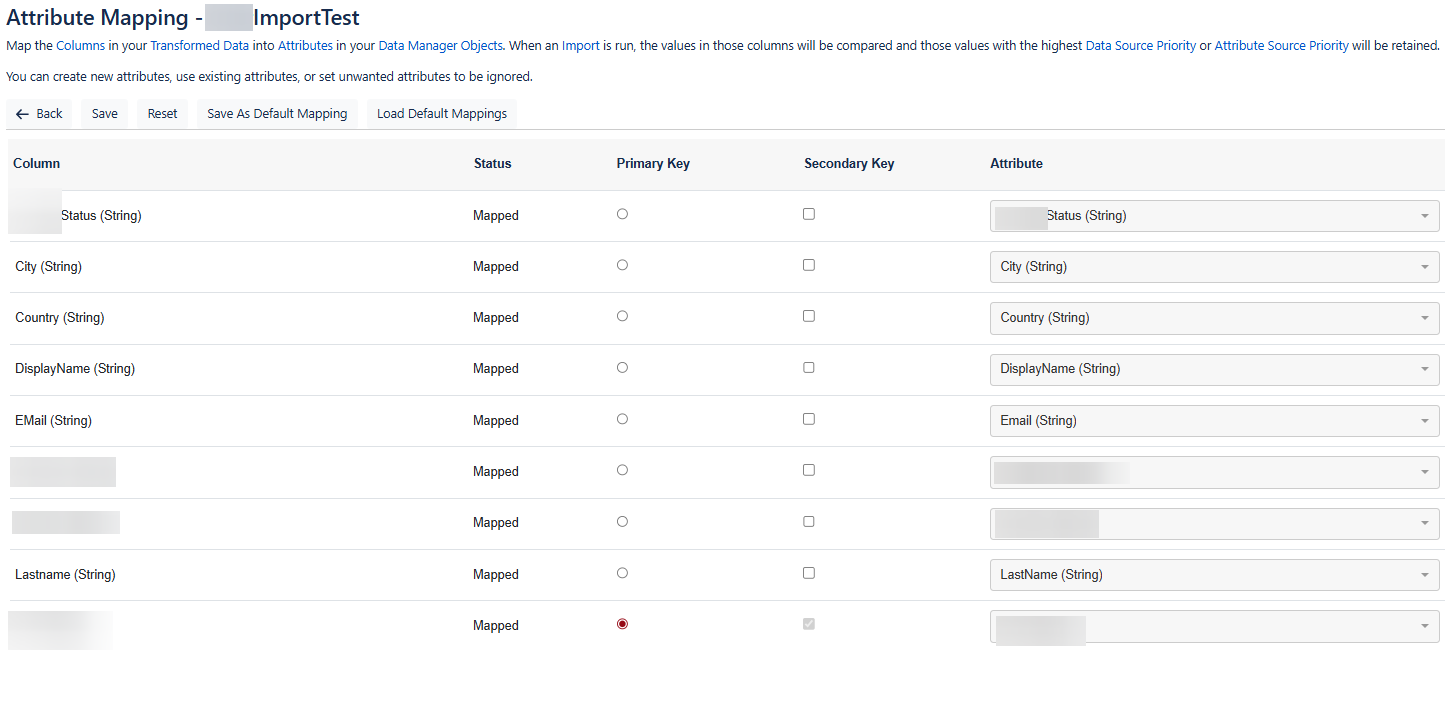
Define Custom Mappings
We start by mapping the columns to the corresponding attributes, you can map to existing ones or create new ones, The data type of each column is shown in the brackets.
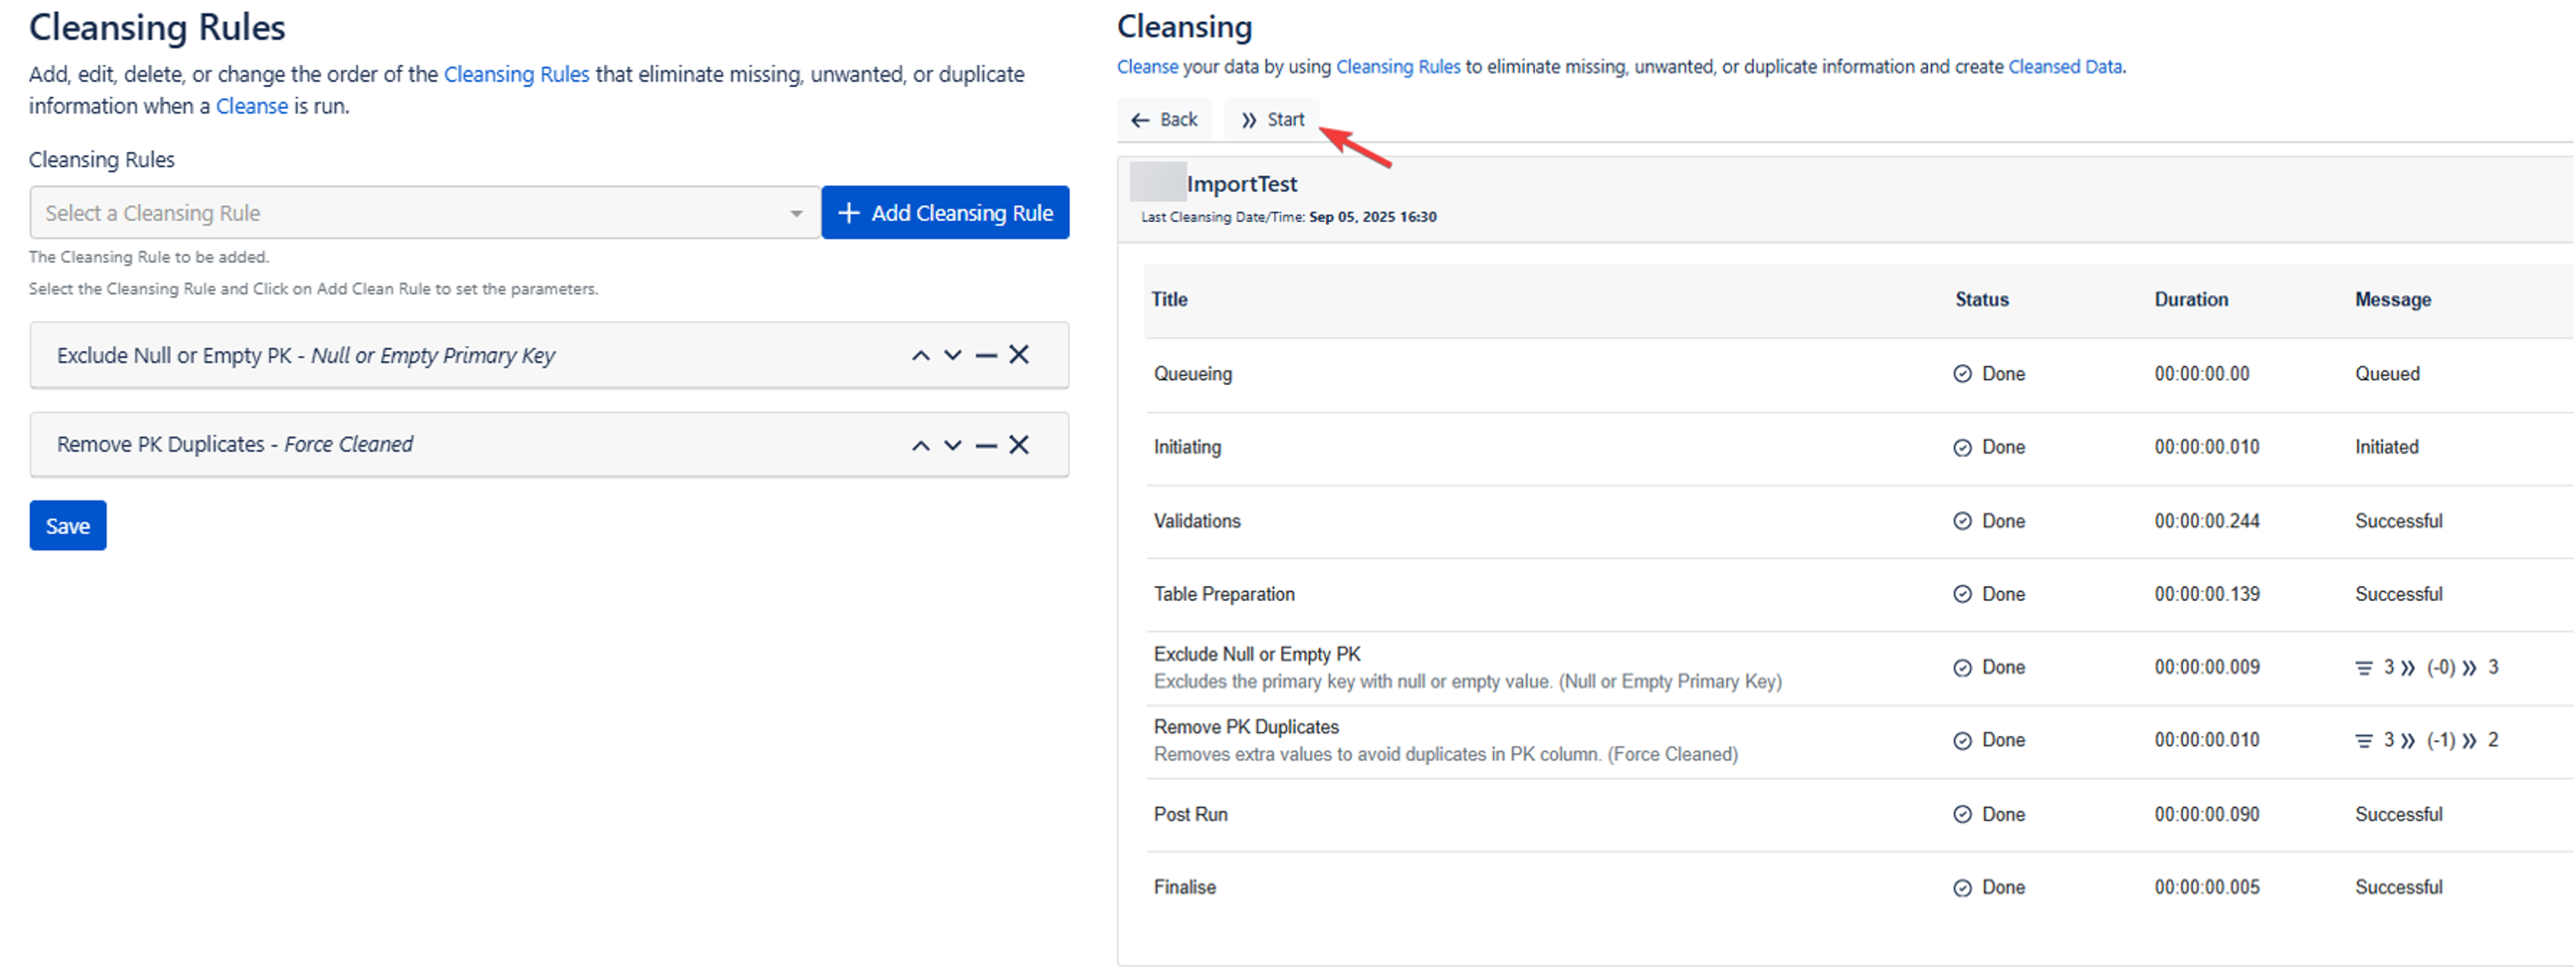
Cleanse The Data
Data cleansing ensures consistent and accurate information, for example you can:
- Exclude Empty or Null Primary Keys which ensures you don't have data that is missing the main value needed for import into Assets.
- Remove duplicates using primary key or comparison rules.
Once you have selected your cleansing rules you can click “Cleanse“ the start to run those rules.
Import into Data Manager Objects
Once everything is clean and mapped, click import then start. You will see each step as its completed and the status will be under the Message column.

Import Data into Assets Schema
Now that the data has been cleansed and structured to align with your Assets schema, you can proceed with the import. There are two primary methods for transferring the data into Assets:
- Legacy approach: Create a search within Data Manager, export the saved search as a CSV file, and then manually upload it into Assets.
- Modern approach (recommended): Create a search and import it directly into Assets using the built-in import integration for saved searches.
Create a Saved Search
Go to Analysis, then select the object class that you’ve just imported data into.
From this view, you can apply filters to display only the specific records you intend to import into Assets.
Tip: Even if you intend to import all available data, you must first create a saved search that includes all records. This saved search acts as the source definition for your import into Assets.

Import into Assets
After clicking “Save as New Search” and naming your search, got to the assets importer in the schema settings then click “Data Manager Import”.
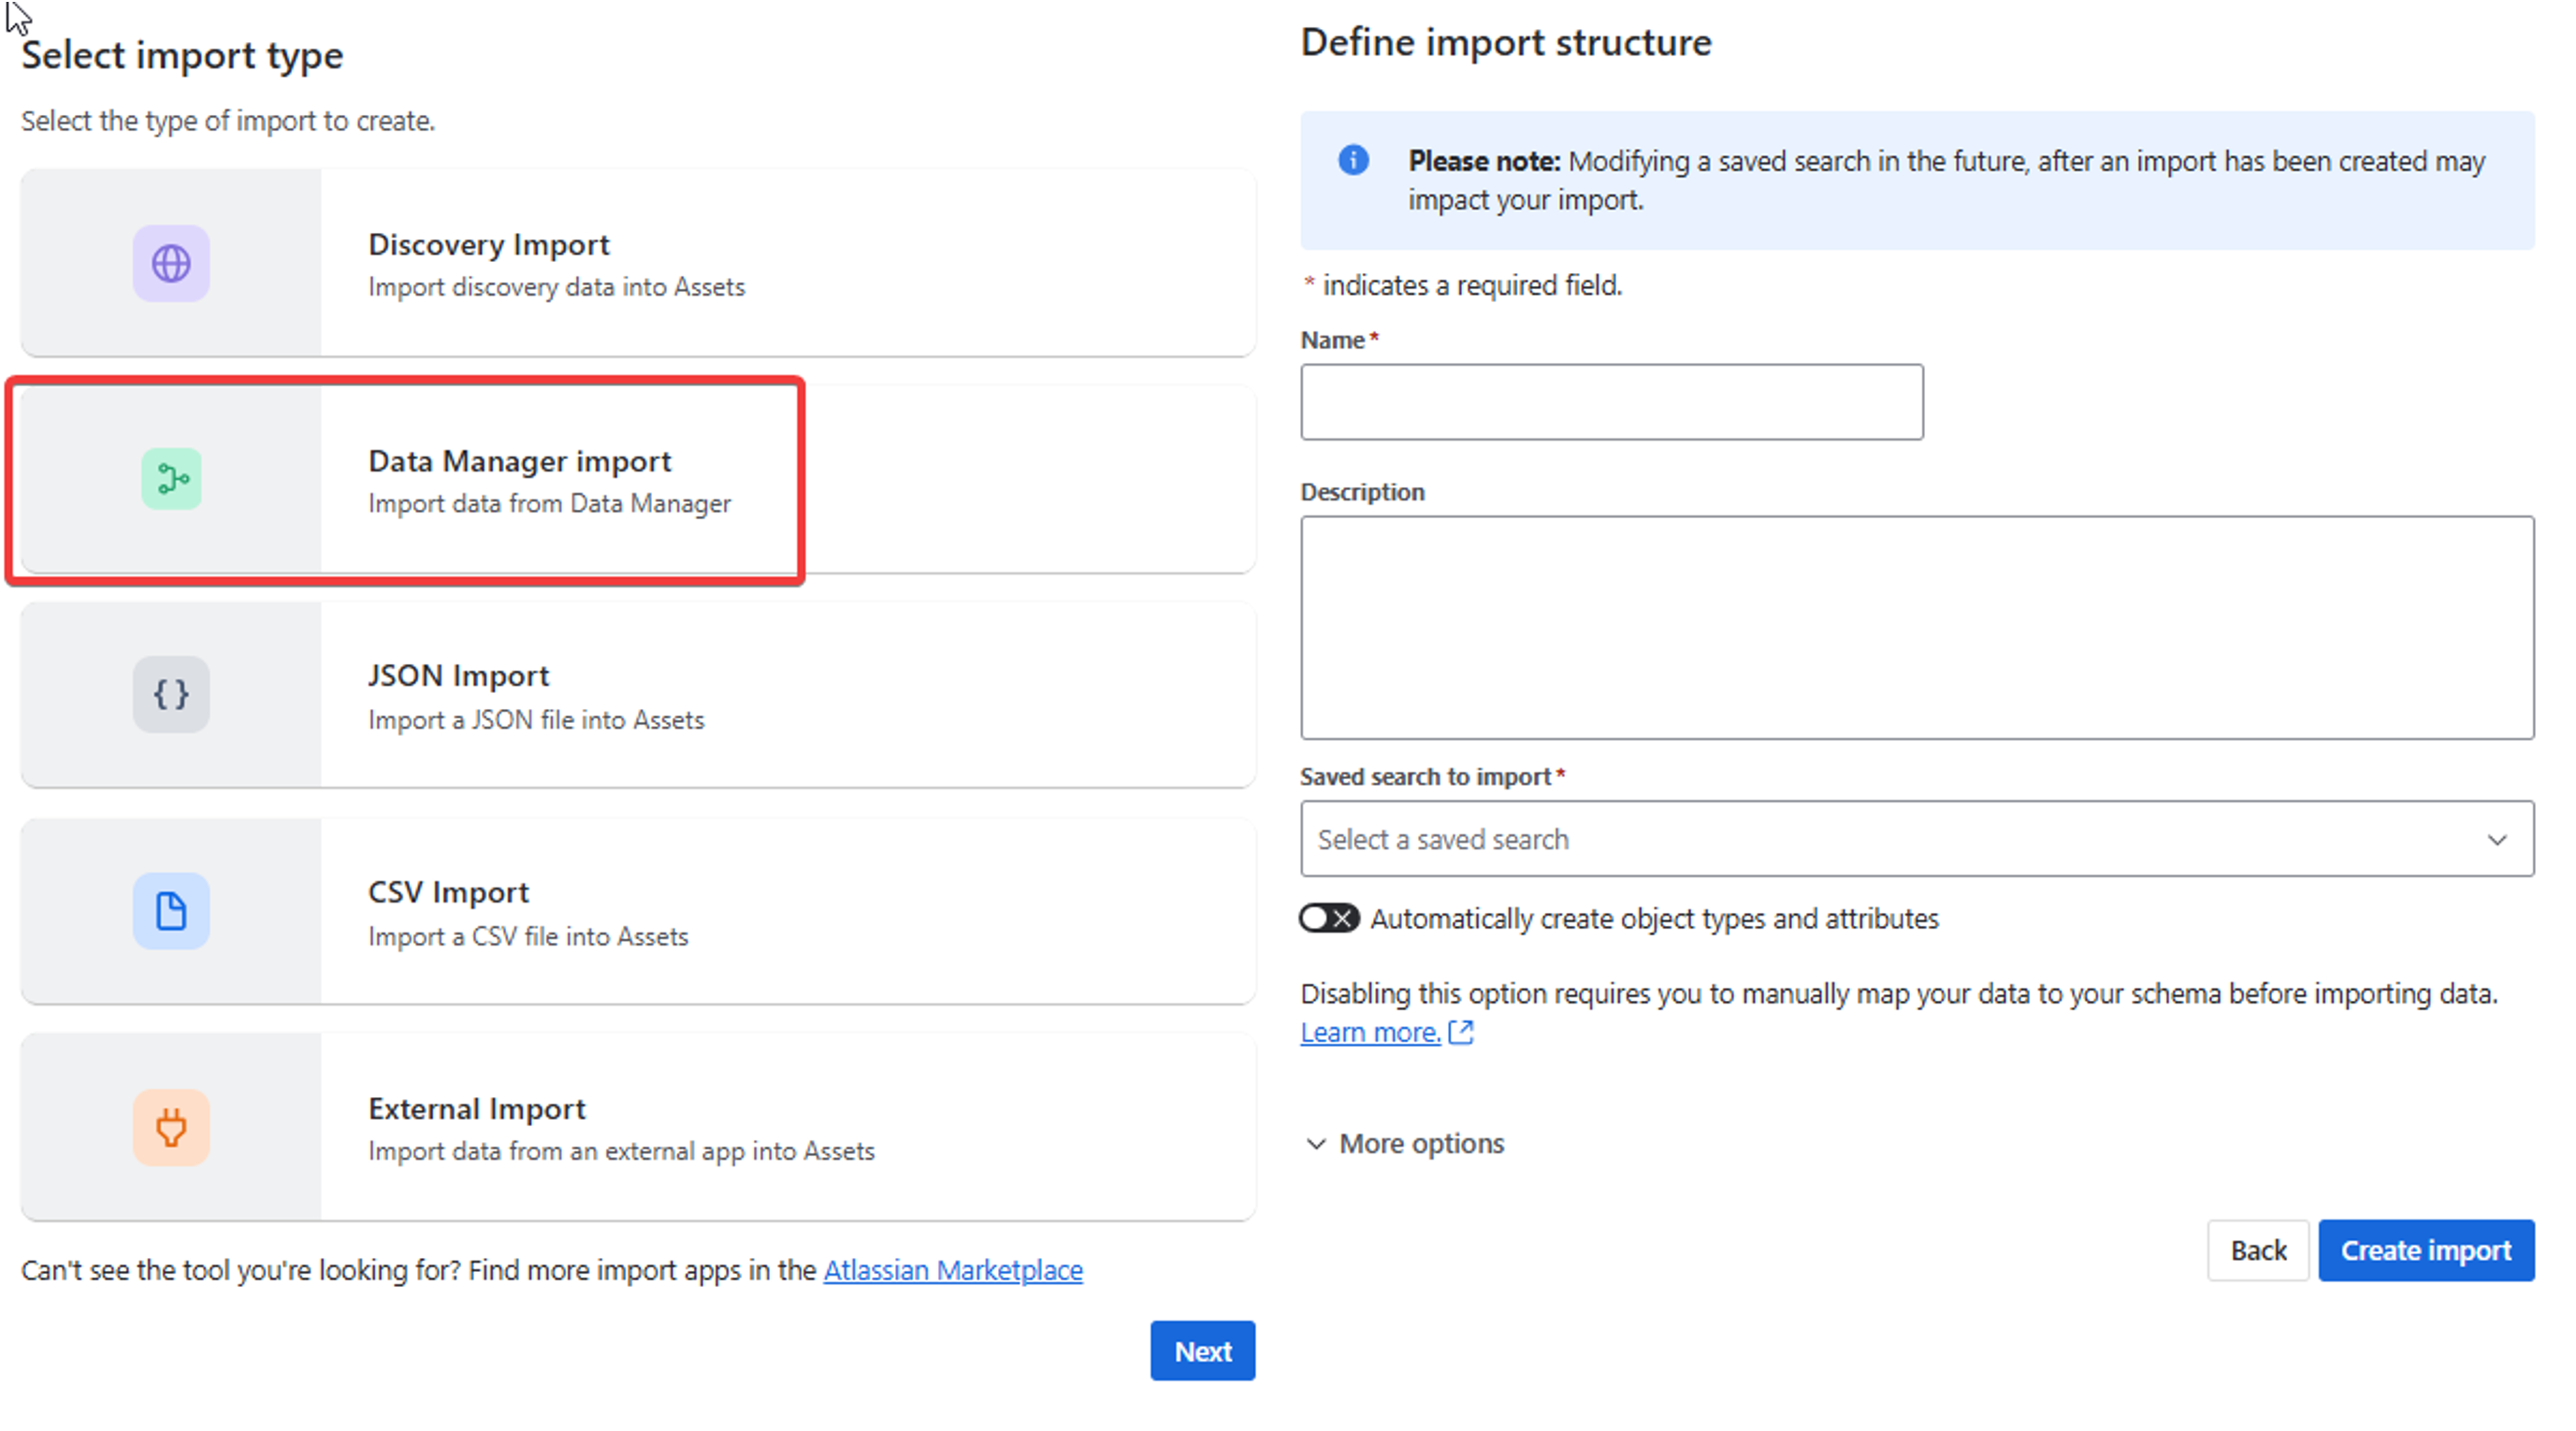
You can then Name the import, provide a clear Description, and select the appropriate Saved Search to Import from Data Manager.
Tip: Keep the “Automatically create object types and attributes” option turned off if you’re importing data into an existing object type. Always include a concise description so that other users can easily understand the purpose and scope of the import.
After that it functions just like a normal asset import, map the import to an object type then map columns to attributes then click import.
Summary
Setting up Assets Data Manager (ADM) is more than just importing data — it’s about establishing a sustainable, automated data flow between your external sources and Atlassian Assets. By investing time in cleansing, mapping, and validating your data, you ensure that the information within Assets remains accurate, consistent, and valuable to teams across your organization.


.webp)


